Toilet paper roll bracelets are a simple, creative, and inexpensive craft that children can make using materials they might already have at home. Instead of throwing away empty cardboard toilet paper rolls, families and teachers can turn them into colorful bracelets with paint, paper, stickers, yarn, beads, and other decorations.
This craft is especially useful for children because it combines creativity with recycling. Kids can choose their favorite colors, experiment with patterns, and design bracelets that reflect their personalities. Toilet paper roll bracelets are also suitable for classroom activities, birthday parties, rainy days, summer crafts, and environmental projects.
What Are Toilet Paper Roll Bracelets?
A toilet paper roll bracelet is a handmade accessory created from the cardboard tube left after a toilet paper roll is used. The tube is cut into smaller sections and decorated to create a bracelet shape.
Because cardboard is flexible and lightweight, it can be easily transformed into different styles. Children can make simple colorful bracelets or more detailed designs using recycled materials.
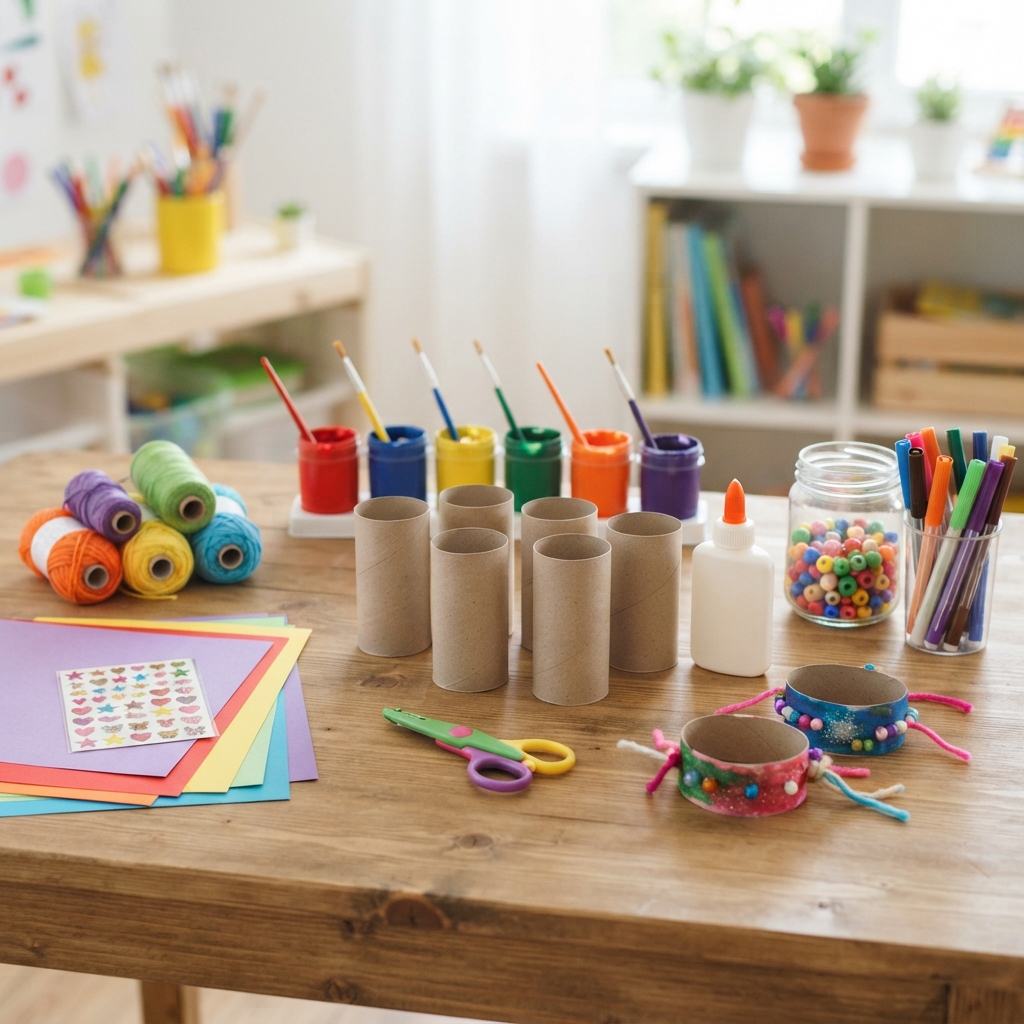
The project does not require expensive craft supplies. A cardboard tube, scissors, glue, and some decorations are usually enough to get started.
Why Children Love Making Cardboard Bracelets
Children enjoy this craft because they can make something that looks like a real piece of jewelry from an ordinary household item.
The activity also gives kids plenty of creative freedom. One child might create a rainbow bracelet, while another may make a bracelet covered with flowers, stars, hearts, or animal designs.
Making bracelets can also encourage:
- Fine motor skills
- Hand-eye coordination
- Creativity
- Color recognition
- Pattern making
- Patience
- Recycling awareness
- Independent decision-making
Most importantly, children get to enjoy the satisfaction of creating something with their own hands.
Materials Needed
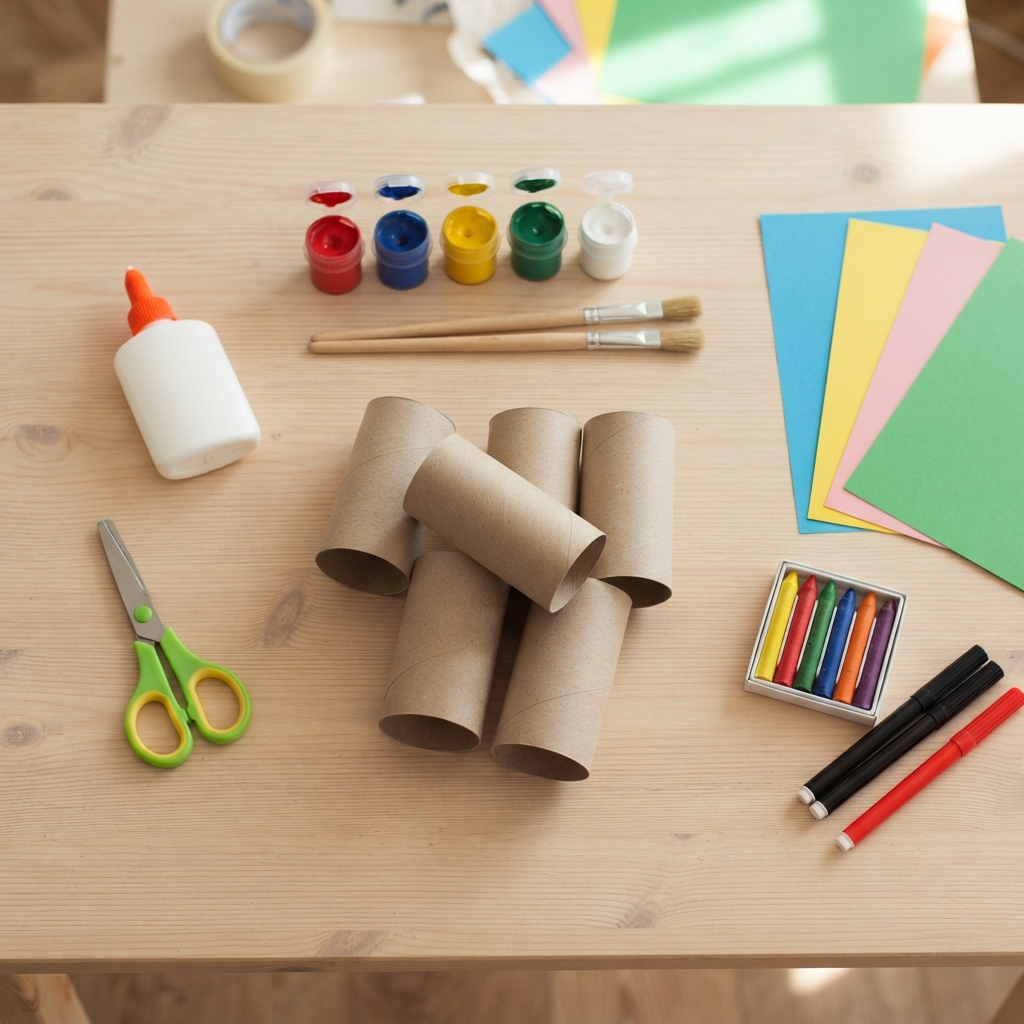
You only need a few simple materials to make toilet paper roll bracelets.
Basic Supplies
- Empty toilet paper rolls
- Child-safe scissors
- Glue
- Paint
- Paintbrushes
- Colored paper
- Markers or crayons
Optional Decorations
You can also collect:
- Stickers
- Yarn
- Ribbon
- Washi tape
- Foam shapes
- Paper flowers
- Buttons
- Large craft beads
- Sequins
- Pom-poms
- Glitter
- Fabric scraps
For younger children, choose larger decorations that are easy to handle.
How to Make a Toilet Paper Roll Bracelet
The basic method is very easy and can be completed in several steps.
Step 1: Collect an Empty Toilet Paper Roll
Start with a clean, empty cardboard toilet paper roll.
If you are doing the activity at school, ask families to save cardboard rolls in advance. This can turn the project into a simple recycling lesson.
Step 2: Flatten the Roll
Gently press the cardboard tube flat.
You do not need to make it completely flat. The goal is simply to make cutting easier.
Step 3: Cut the Tube
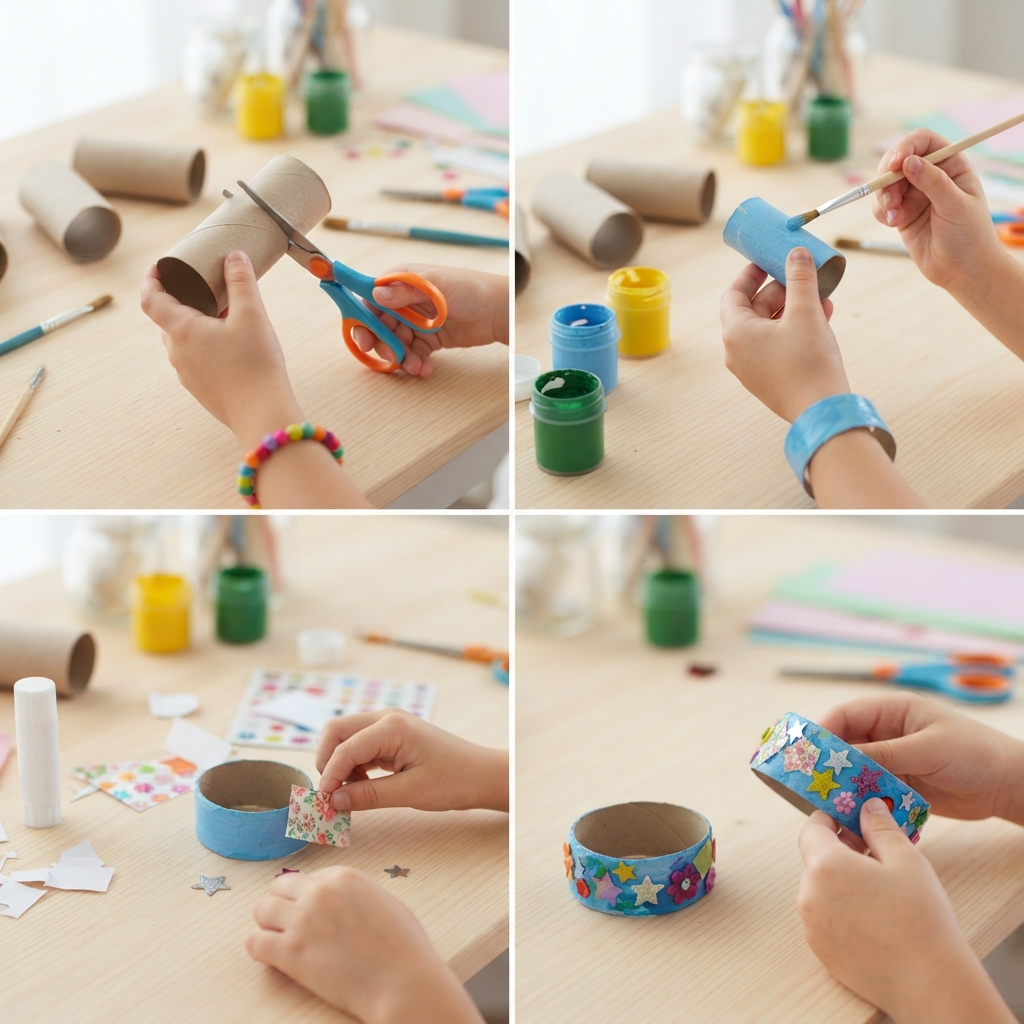
An adult can cut the cardboard roll into rings approximately 1–2 inches wide, depending on the desired bracelet style.
For younger children, adults should do the cutting because scissors can be difficult to use safely on thick cardboard.
Step 4: Create the Bracelet Opening
Cut one side of the cardboard ring so that it becomes an open strip.
This allows the bracelet to be placed around the wrist without forcing the cardboard over the hand.
Make sure the edges are smooth.
Step 5: Choose a Design
Before decorating, ask children to think about their design.
They might choose:
- A rainbow
- Flowers
- Hearts
- Stars
- Animals
- Stripes
- Polka dots
- Their name
- A favorite color
Planning the design first can make the decorating process easier.
1. Painted Toilet Paper Roll Bracelet

Painting is one of the easiest ways to decorate a cardboard bracelet.
Choose acrylic or washable craft paint suitable for children. Paint the entire surface of the cardboard and allow it to dry.
Once the first layer is dry, children can add dots, stripes, stars, hearts, or other patterns.
A rainbow bracelet can be created by painting several colorful stripes around the cardboard.
2. Paper-Wrapped Bracelet
Colored paper can transform a plain cardboard bracelet into a bright accessory.
Cut a piece of colored paper slightly larger than the cardboard bracelet. Apply glue to the cardboard and carefully wrap the paper around it.
Trim any extra paper.
Children can then decorate the paper with markers, stickers, or small drawings.
3. Yarn-Wrapped Bracelet
Yarn creates a soft and colorful texture.
Choose several colors of yarn and wrap them around the cardboard bracelet. Place a small amount of glue on the bracelet to help keep the yarn in place.
Children can use one color or combine several colors to make stripes.
This version is particularly fun for kids who enjoy colorful textile crafts.
4. Beaded Cardboard Bracelet

Children who enjoy beadwork can combine cardboard with beads.
First, decorate the cardboard base with paint or paper. Then add larger craft beads using strong glue.
Another option is to make small holes along the edges of the cardboard and thread yarn through them with large beads.
Adult supervision is recommended when working with small beads because they can be a choking hazard.
5. Nature-Themed Bracelet
A nature bracelet can be part of a classroom lesson about plants and the environment.
Paint the cardboard green and decorate it with paper leaves, flowers, butterflies, or other nature shapes.
Children can create their own miniature garden around the bracelet.
This project works especially well during spring.
6. Animal-Themed Bracelets
Children can turn their cardboard bracelets into animal designs.
Try making:
- A ladybug bracelet
- A bee bracelet
- A frog bracelet
- A butterfly bracelet
- A panda bracelet
- A tiger bracelet
For example, a bee bracelet can be painted yellow and decorated with black stripes. Add paper wings to create a cute three-dimensional effect.
7. Rainbow Bracelet
A rainbow bracelet is simple and cheerful.
Paint the cardboard in rainbow colors or wrap it with strips of colored paper.
Use red, orange, yellow, green, blue, and purple to create the rainbow effect.
Children can add white paper clouds at the ends for an extra detail.
8. Friendship Bracelets
Toilet paper roll bracelets can also become friendship gifts.
Children can make two matching bracelets for themselves and a friend.
They can use the same colors, write each other’s names, or decorate the bracelets with hearts and stars.
This activity encourages children to think about friendship, kindness, and sharing.
9. Personalized Name Bracelets
A personalized bracelet is a great school craft.
Paint or cover the cardboard with a favorite color. Then write the child’s name across the bracelet using markers or letter stickers.
Children can decorate the name with hearts, stars, flowers, or other shapes.
These bracelets can also be used as fun name tags during classroom activities.
10. Holiday-Themed Bracelets
Cardboard bracelets can easily be adapted for holidays and special occasions.
Halloween
Use orange and black paint and add pumpkins, ghosts, bats, or spiders.
Christmas
Try red, green, white, and gold with stars or snowflake decorations.
Valentine’s Day
Use pink, red, and purple with hearts.
Easter
Use pastel colors and decorate with eggs, flowers, and bunnies.
Birthday Parties
Let each child create a bracelet using the party’s favorite colors.
A Simple Classroom Bracelet Activity
Toilet paper roll bracelets are excellent for classroom craft time.
Before the activity, prepare enough cardboard pieces for every child. Place paints, markers, glue, paper, stickers, and other decorations on separate tables.
Give each child one cardboard bracelet and allow them to choose their own design.
Once everyone has finished, create a classroom display showing the different bracelets.
Teachers can use the activity to introduce lessons about recycling, colors, patterns, or personal expression.
Make the Activity Educational
This craft can become more than an art project.
Recycling Lesson
Explain how cardboard tubes can be reused instead of immediately being thrown away.
Math Lesson
Ask children to create repeating patterns such as:
Red – Blue – Red – Blue
or:
Yellow – Green – Purple – Yellow – Green – Purple
Children can count the colors and identify the repeating sequence.
Color Lesson
Ask students to identify warm and cool colors or create a rainbow.
Writing Activity
After finishing their bracelet, children can write a few sentences describing their design.
For example:
“My bracelet is blue and yellow. I added three stars because stars are my favorite.”
Tips for Making Better Bracelets
There are several simple ways to make the finished bracelets look neat.
First, make sure the cardboard edges are smooth. Rough edges can be uncomfortable against the skin.
Use a thin layer of glue rather than applying too much. Excess glue can make the bracelet messy and take longer to dry.
Allow paint and glue to dry completely before children wear the bracelets.
If you are adding decorations, avoid placing too many heavy objects on one bracelet because they can make the cardboard bend.
Easy Design Ideas for Beginners
If children do not know what to make, start with a simple pattern.
Polka Dot Bracelet
Paint the bracelet one color and add dots in another color.
Stripe Bracelet
Create horizontal or diagonal stripes using two or three colors.
Star Bracelet
Paint the base blue or purple and add paper stars.
Flower Bracelet
Use green paint as the background and add colorful paper flowers.
Ocean Bracelet
Paint the cardboard blue and add fish, bubbles, seaweed, and waves.
How to Make the Bracelets More Durable
Cardboard is not waterproof, so finished bracelets should be kept away from water.
A layer of child-safe craft sealer can help protect the decorations, but it should be applied by an adult in a well-ventilated area and allowed to dry completely.
Another simple option is to cover the decorated bracelet with clear adhesive film. This can protect the paper from light moisture and everyday handling.
Safety Tips
Safety is important during every children’s craft activity.
Adults should supervise children while they are crafting. Scissors should be appropriate for the child’s age, and younger children may need an adult to cut the cardboard.
Small beads, buttons, sequins, and other tiny decorations can be choking hazards. Keep these materials away from very young children.
Use child-friendly glue and paints, and follow the instructions on the packaging.
Make sure all bracelets have smooth edges and do not fit too tightly around the wrist.
Why Recycling Makes This Craft Special
One of the best things about toilet paper roll bracelets is that they turn an everyday waste item into something useful and beautiful.
Children learn that many household materials can have a second life. Instead of seeing an empty cardboard roll as trash, they can see it as the beginning of a new creative project.
This simple idea can help introduce children to recycling and responsible use of materials.
More Recycled Bracelet Ideas
Once children enjoy toilet paper roll bracelets, they can experiment with other recycled materials.
Try making bracelets from:
- Cardboard cereal boxes
- Paper towel rolls
- Old magazines
- Fabric scraps
- Paper bags
- Recycled wrapping paper
Always make sure the materials are clean and safe before using them.
Conclusion
Toilet paper roll bracelets are an easy, inexpensive, and creative craft for children. With a simple cardboard tube, some paint, paper, yarn, stickers, or beads, kids can create colorful bracelets in countless designs.
They can make rainbows, flowers, animals, hearts, stars, friendship bracelets, personalized name bracelets, and seasonal decorations. The activity can also be connected to lessons about recycling, colors, patterns, math, and creativity.
Most importantly, making these bracelets gives children an opportunity to use their imagination and transform an ordinary household item into something special. With adult supervision and age-appropriate materials, toilet paper roll bracelets can become a fun project for home, school, parties, and creative learning.