Making a small school table and chair from wooden sticks is a simple, creative, and educational craft project for children. With a handful of wooden craft sticks, glue, cardboard, and a little imagination, an ordinary collection of sticks can become a charming miniature classroom set. This project is especially suitable for school assignments, classroom decorations, miniature scenes, dollhouses, and creative activities at home.
A miniature school table and chair can look simple, but building one teaches many useful skills. Children learn how to measure, arrange, connect, and balance different pieces. They also practice patience and careful hand movements while cutting and gluing materials. Most importantly, the activity encourages children to turn simple objects into something new and meaningful.
Why Make a Miniature School Table and Chair?
A school table and chair are familiar objects in children’s daily lives. Students spend a large part of their school day sitting at desks, writing, reading, drawing, and completing assignments. Creating miniature versions allows children to explore these familiar objects from a different perspective.
The project also introduces children to basic construction principles. A table needs a flat surface and supporting legs. A chair needs a seat, legs, and a backrest. These simple structures help children understand how objects are designed to remain stable.
Wooden craft sticks are particularly useful because they are lightweight, inexpensive, and easy to arrange. They can be placed side by side to form flat surfaces or joined together to create supports.
Materials Needed

The main material for this project is wooden craft sticks. Standard wooden popsicle sticks are ideal because they are relatively uniform in size.
Other materials include child-safe craft glue, a small piece of cardboard, a pencil, a ruler, scissors, and colored markers or paint. Optional materials include sandpaper, colored paper, stickers, ribbon, and small pieces of fabric.
A flat work surface should be prepared before beginning. All materials should be placed within easy reach so the project can be completed without unnecessary interruptions.
Planning the Miniature Furniture
Planning is one of the most important parts of the project. Before gluing the sticks together, children should decide how large the table and chair should be.
The table should be slightly larger and taller than the chair. The chair should be positioned so that its seat would appear to fit comfortably under the table.
A simple sketch can help children visualize the finished furniture. They can draw the tabletop, legs, chair seat, backrest, and supports.
A ruler can be used to compare lengths and make the pieces more consistent. Although the furniture does not have to be perfectly measured, keeping the proportions similar will make the finished model look more realistic.
Preparing the Wooden Sticks
Wooden craft sticks should be checked before use. Some sticks may have rough edges or small splinters. Adults can help younger children inspect the materials and carefully smooth rough areas when necessary.
If the project requires cutting wooden sticks, adult supervision is recommended. Many designs can be created without cutting the sticks at all, which makes the project easier and safer.
Children can sort the sticks into groups for different parts of the furniture. For example, one group can be used for the tabletop, another for the legs, and another for the chair.
Sorting the materials before construction makes the process more organized.
Making the Tabletop
The tabletop is usually the first major part to build. Several wooden sticks can be placed side by side to form a rectangular surface.
A small piece of cardboard can be placed underneath the sticks to provide extra support. The cardboard should be slightly smaller than the finished tabletop so that it is not easily visible.
Glue can be applied carefully along the connecting areas. The sticks should be pressed gently together and allowed to dry.
The tabletop can remain the natural color of the wood or be painted later.
Creating Table Supports
Once the tabletop is ready, the legs can be attached. Four wooden sticks can represent the four legs.
The legs should be positioned near the corners of the tabletop. They need to be attached firmly so the table can stand upright.
Small horizontal sticks can be added between the legs to strengthen the structure. These supports can also make the miniature table look more realistic.
Children should allow the glue to dry before moving the table. Moving it too early may cause the legs to become crooked or fall off.
Making the Chair Seat
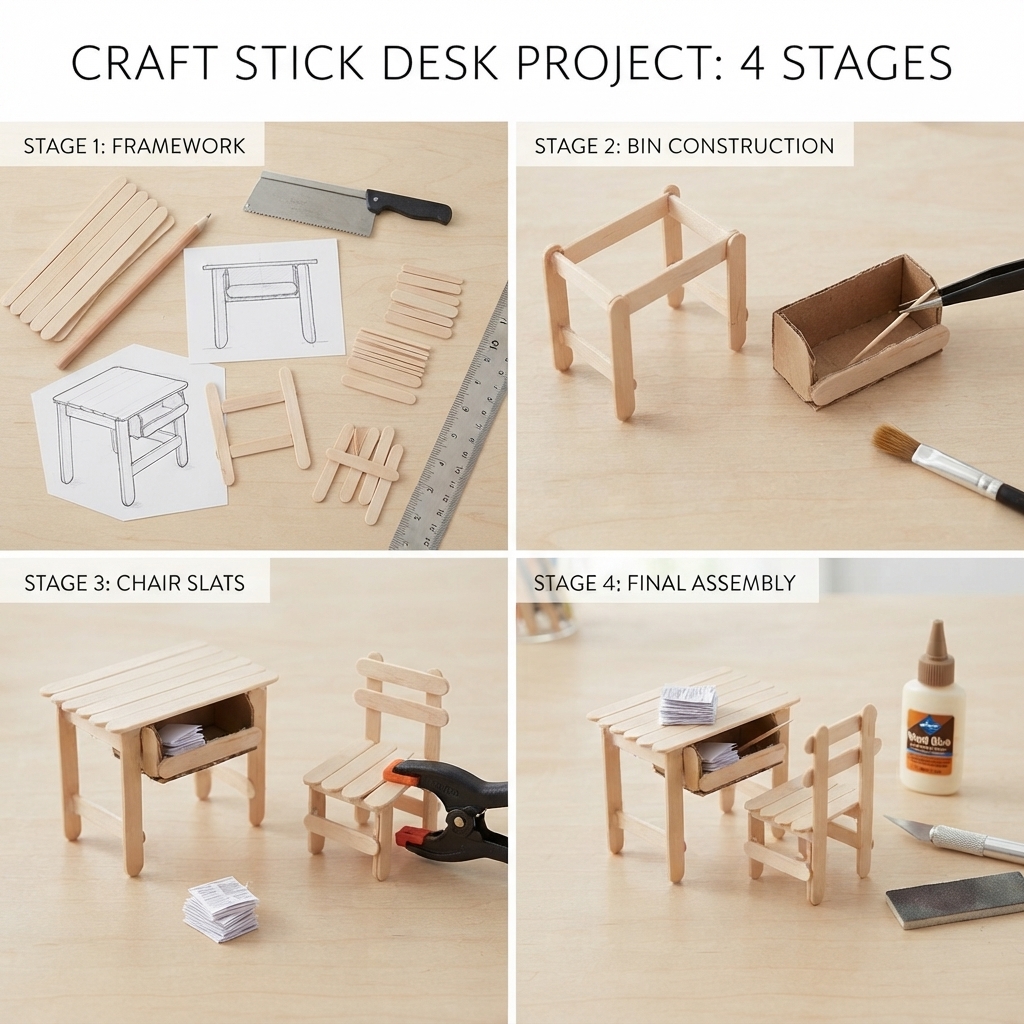
The chair can be constructed using the same basic idea as the table. Several wooden sticks can be placed side by side to form a small rectangular seat.
A small piece of cardboard underneath the sticks can make the seat stronger.
The seat should be smaller than the tabletop. This difference in size helps create realistic proportions.
Once the seat is assembled, it should be left flat until the glue has dried.
Adding the Chair Legs
Four smaller wooden sticks can be used as the chair legs. They should be attached underneath the seat, with one leg near each corner.
The legs need to be positioned carefully. If one leg is longer or placed at an unusual angle, the chair may not stand properly.
Small cross-supports can be added between the legs. These supports make the chair stronger and add detail to the miniature furniture.
A stable chair should be able to stand on its own without leaning to one side.
Creating the Chair Backrest
The backrest gives the miniature chair its recognizable school-chair shape. Several wooden sticks can be placed vertically or horizontally to create it.
A simple design can use two vertical sticks as supports with two or three horizontal sticks between them.
The backrest should be attached securely to the rear of the seat. It can be positioned straight upward or at a slight angle.
Children can experiment with different arrangements to create modern or traditional-looking chairs.
Connecting the Parts
The next stage is checking that all the parts fit together. The table and chair should stand independently.
Children can place the chair underneath the table to see whether the proportions look correct. If the chair is too tall, the table may appear too low. If the chair is too small, the model may look unusual.
This stage teaches children about scale and proportion. They can make adjustments before decorating the furniture.
Decorating the Furniture
Once the construction is complete and the glue has dried, children can decorate their miniature furniture.
The wooden sticks can be painted in bright colors. A classroom theme might use blue chairs and natural-colored tables, while a playful miniature classroom could use several different colors.
Markers can be used to draw small patterns. Children can add stars, flowers, geometric shapes, or simple school symbols.
Colored paper can also be attached to the tabletop or chair seat.
Creating a Wooden-Look Finish
Some children may prefer to keep the natural appearance of the wooden sticks. In this case, the furniture can be left unpainted.
A small amount of paper or cardboard can be used to create a tabletop surface while leaving the wooden edges visible.
The natural wooden appearance gives the furniture a simple and realistic style.
If a protective finish is desired, adults should choose a child-safe product and supervise its application.
Adding a Miniature School Desk
The table can be transformed into a more traditional school desk by adding a small storage compartment.
A tiny cardboard box can be attached underneath the tabletop. This compartment can represent the space where students store books and school supplies.
Another option is to attach a narrow wooden-stick shelf under the tabletop.
Small pieces of paper can represent notebooks stored inside the compartment.
Making Miniature School Supplies
The furniture becomes even more interesting when surrounded by tiny school supplies. Children can make miniature books from folded paper.
Small pieces of cardboard can become notebooks, rulers, or folders. Tiny paper rolls can represent pencils or crayons.
A miniature pencil case can be made from a small folded piece of paper. A tiny backpack can also be placed beside the chair.
These details turn the simple furniture into part of a complete miniature classroom.
Creating a Miniature Classroom
The table and chair can be used as the center of a larger school model. Children can make several tables and chairs and arrange them in rows.
A cardboard base can become the classroom floor. Paper walls, windows, a door, and a blackboard can be added around the furniture.
A teacher’s desk can be created using a larger version of the same wooden-stick construction.
Small paper students can be placed at the desks, creating a complete classroom scene.
Making a Classroom Blackboard
A miniature blackboard is easy to create. A rectangular piece of cardboard can be covered with dark-colored paper.
Children can draw small letters, numbers, or simple pictures on the board using a white or light-colored marker.
The blackboard can be attached to a cardboard wall behind the tables.
This addition helps viewers immediately understand that the wooden furniture belongs in a classroom.
Creating a Teacher’s Desk
A teacher’s desk can be made using the same basic technique as the student table. The tabletop can be slightly larger and the legs slightly taller.
A small paper book, pencil holder, or stack of papers can be placed on top.
Children can personalize the teacher’s desk with a miniature name card.
Educational Benefits
Building furniture from wooden sticks provides many educational benefits. The activity develops fine motor skills because children must pick up, position, and glue small pieces.
It also improves concentration. The sticks must be aligned carefully to create straight surfaces.
Basic mathematics is involved as well. Children can count sticks, compare lengths, measure distances, and explore shapes.
The activity also introduces basic engineering concepts. Students discover that strong structures require supports and that balanced legs help furniture remain upright.
Encouraging Problem-Solving
Craft projects rarely go perfectly on the first attempt. A table leg may become loose, a chair may lean, or the tabletop may not be straight.
These challenges provide opportunities for children to solve problems. They can decide whether to add another support, reposition a stick, or reinforce a joint.
Instead of viewing mistakes as failures, children can learn that mistakes are part of the creative process.
This encourages persistence and confidence.
Recycling and Responsible Crafting
Wooden craft sticks are inexpensive, but the project can also incorporate recycled materials. Cardboard packaging can be used to reinforce the furniture or create the classroom base.
Old paper can become notebooks and posters. Reused fabric can become miniature classroom curtains or rugs.
Using recycled materials helps children understand the importance of reducing waste and finding new uses for everyday objects.
Safety Considerations
Safety should always be a priority. Children should use scissors and craft materials according to their age and ability.
If wooden sticks need to be cut, an adult should handle sharp tools or supervise closely. Rough wooden edges should be checked carefully.
Glue should be used in a well-ventilated and organized workspace. Children should avoid touching their eyes or mouths while working with craft materials.
Small decorations should be kept away from very young children because they may be choking hazards.
Displaying the Finished Furniture
The finished table and chair can be displayed on a shelf, classroom table, or miniature school scene.
Students can create several sets and arrange them inside a cardboard classroom. The completed scene can become part of a school exhibition.
A small label can explain that the furniture was created from wooden craft sticks. Students can also describe the construction process to classmates, teachers, or family members.
Conclusion
Making a small school table and chair from wooden sticks is a wonderful craft project that combines creativity, construction, learning, and imagination. With simple wooden sticks, glue, cardboard, and a few decorating materials, children can create realistic miniature classroom furniture.
The project teaches important skills such as measuring, counting, balancing, planning, and problem-solving. It also strengthens fine motor coordination and encourages patience.
The best part of the activity is that the finished furniture can become part of a much larger miniature classroom. Children can add books, backpacks, blackboards, students, teachers, windows, doors, and other details to create a complete school environment.
Whether it is made as a school assignment, a classroom decoration, or a fun activity at home, a miniature wooden-stick table and chair provide children with a meaningful hands-on experience. The project shows that simple materials can be transformed into useful and beautiful creations through careful planning and imagination.
By building something with their own hands, children gain more than a finished craft. They develop confidence, creativity, patience, and an understanding of how individual pieces can work together to form a strong and useful structure. A tiny table and chair made from wooden sticks may be small in size, but they can provide a big lesson in creativity and learning.