Creating a model of a department inside a shoebox is a fun, creative, and educational project that allows students to transform simple materials into a miniature three-dimensional world. A shoebox can become almost anything with a little imagination. It can represent a hospital department, a police department, a fire department, a school department, a science laboratory, or even a department store. The project combines art, design, organization, and learning while giving children an opportunity to understand how different rooms and workplaces are arranged.
A shoebox is especially useful for this type of model because it is small, lightweight, inexpensive, and easy to find. Instead of throwing away an old shoebox, students can reuse it to create something meaningful. Cardboard, colored paper, glue, scissors, markers, bottle caps, craft sticks, small pieces of fabric, and recycled objects can all be transformed into furniture, walls, doors, signs, people, and other details. The result is a miniature department that looks like a real place but is small enough to fit on a desk.
Understanding the Idea of a Department Model
Before beginning the project, it is important to understand what a department is. A department is usually a section of an organization, building, or institution that has a particular purpose. For example, a hospital may have an emergency department, a children’s department, a laboratory, and a pharmacy. A police station may have offices, an evidence room, a reception area, and an interview room.
The model should show the different parts of the chosen department. It does not need to be perfectly realistic. Instead, it should clearly communicate what the department does and how its spaces are organized. Students can choose a department that interests them and then research its basic features before starting the construction.
For younger children, a simple department with only a few areas may be best. Older students can create a more detailed model containing several rooms, furniture, signs, workers, and miniature equipment.
Materials Needed

One of the best things about this project is that it does not require expensive supplies. Many materials can be found around the house or classroom.
The main material is an empty shoebox. A strong cardboard box is preferable because it will hold the walls and decorations securely. Other useful materials include colored paper, white paper, cardboard, scissors, glue, tape, pencils, rulers, crayons, colored markers, and paint.
Small recycled objects can add interesting details. Bottle caps can become tables, wheels, stools, or containers. Ice-cream sticks can become desks, shelves, doors, or benches. Small pieces of cardboard can be used to create walls and furniture. Fabric scraps can become curtains, carpets, blankets, or clothing for miniature figures.
Students may also use modeling clay, beads, buttons, straws, cotton balls, toothpicks, and paper cups. The goal is not to buy everything from a craft store. The project is an opportunity to reuse ordinary materials creatively.
Choosing the Department
The first creative decision is choosing the department to represent. There are many possibilities.
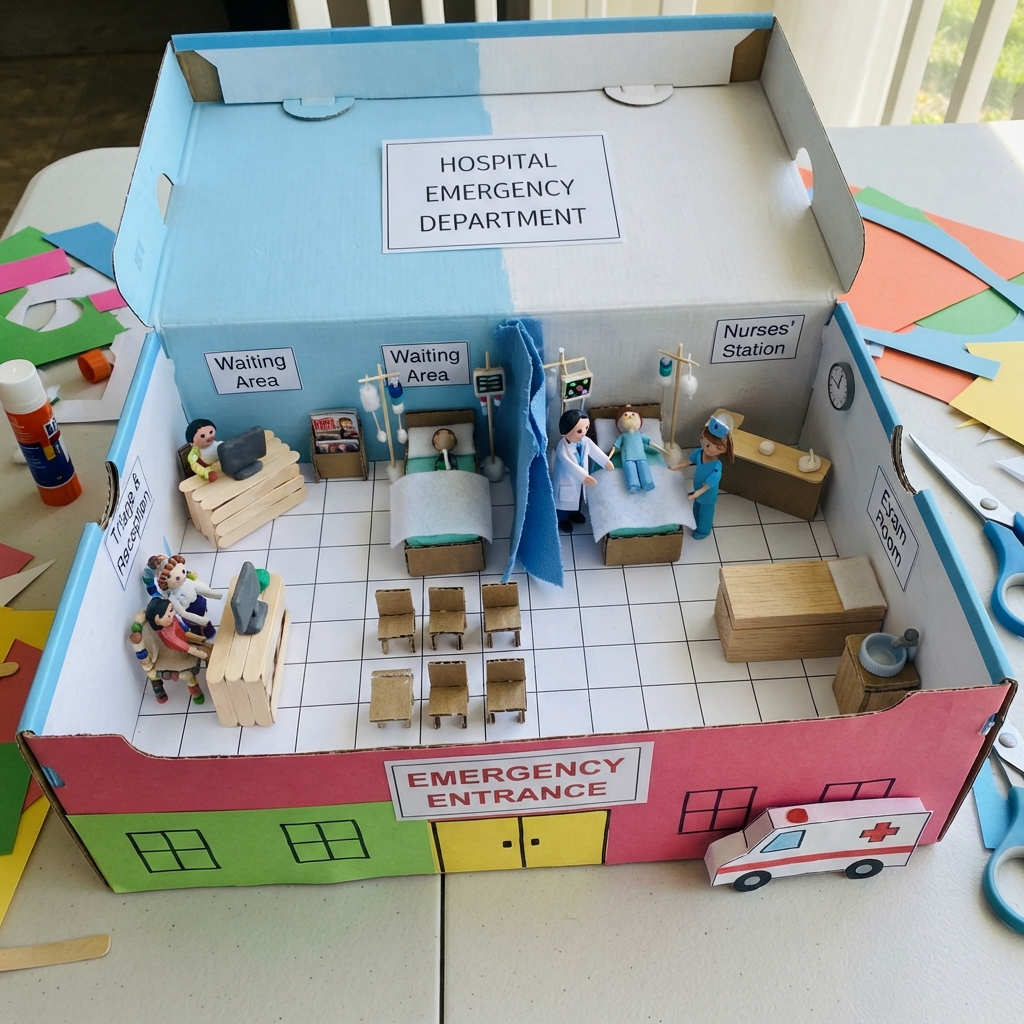
A hospital emergency department can include a reception desk, examination beds, medical equipment, chairs, doctors, nurses, and signs. A fire department can include a fire truck, garage, office, lockers, and firefighters. A police department can have a reception desk, offices, evidence shelves, and a small police vehicle.
Students interested in education could create a school department with desks, a teacher’s table, a board, books, and students. A science department could contain laboratory tables, test tubes, microscopes, shelves, and scientific posters.
Another interesting option is a department store. This model could contain clothing shelves, a cashier, shopping baskets, display tables, customers, and signs.
Choosing the department before collecting materials helps students understand what they need to build.
Preparing the Shoebox
Once the department has been selected, the shoebox should be prepared. The lid can be removed if the model is designed to be open from the top. Alternatively, the lid can be kept and decorated as part of the project.
The inside of the box becomes the main room. The bottom of the box can represent the floor, while the sides become walls. Students can cover the walls with colored paper or paint them carefully.
A ruler can be used to draw straight lines. Doors and windows can be made from cardboard or colored paper. If the department has several rooms, thin pieces of cardboard can be attached inside the shoebox to create partitions.
Planning is important at this stage. Students should avoid gluing everything immediately. It is better to place the major objects inside the box first and decide where they should go.
Designing the Floor
The floor gives the model a finished appearance. Different departments may require different types of flooring.
A hospital model might have a smooth white or light-colored floor. A fire station could have a gray floor representing concrete. A school might have a colorful floor. A department store could use patterned paper to create a decorative appearance.
The floor can be made by cutting a piece of paper or cardboard to fit the bottom of the shoebox. Students can draw tiles, wooden boards, lines, or other patterns on it before attaching it.
A small piece of fabric can even become a carpet. This simple detail can make the model look much more realistic.
Creating Furniture
Furniture is one of the most enjoyable parts of the project. Small pieces of cardboard can be turned into desks, chairs, beds, tables, shelves, and counters.
For example, a desk can be made by attaching four small cardboard strips underneath a rectangular piece. A chair can be created from folded cardboard. Shelves can be made from small layers of cardboard glued against a wall.
Students do not need to make every object perfectly. Simple shapes are often enough to communicate what an object represents.
For a hospital department, a small rectangular piece of cardboard covered with white paper can become a hospital bed. Bottle caps can serve as stools or containers. A small box can become a medical cabinet.
For a police department, cardboard tables, chairs, filing cabinets, and evidence shelves can be created. For a school department, miniature desks and a teacher’s table can be arranged in rows.
Adding Doors and Windows
Doors and windows help make the model look like a real building. A door can be cut from cardboard and attached to one of the walls. It can be left slightly open to create a three-dimensional effect.
Windows can be made from blue paper or transparent plastic. A simple frame can be drawn around the window using a marker. Students can also add curtains using small pieces of fabric.
If the department has a special entrance, such as a hospital emergency entrance or fire station garage, it can be made larger than the other doors. Signs can be placed above each entrance to identify the different areas.
Making Miniature People
People make the department feel active and realistic. Students can create tiny workers, visitors, customers, patients, teachers, police officers, firefighters, or doctors.
Paper figures are one of the easiest options. A simple human shape can be drawn, colored, cut out, and attached to a small cardboard base. Modeling clay can also be used to create small three-dimensional people.
Clothing can help identify each person’s role. A doctor could wear a white coat, a firefighter could wear protective clothing, and a police officer could wear a uniform. These small visual details make the model easier to understand.
Students can also create different poses. One person might be standing behind a desk while another is sitting in a chair.
Creating Signs and Labels
Labels are very useful in a department model. They tell viewers what each part of the model represents.
Students can make small signs from white or colored paper. Examples include “Reception,” “Office,” “Laboratory,” “Emergency,” “Waiting Room,” “Storage,” or “Staff Room.”
A large sign showing the name of the department can be placed above the main entrance. Clear handwriting or printed labels can make the project look neat and professional.
Labels also have educational value because they help students remember the purpose of each area.
Adding Special Details
The small details often make the biggest difference. Once the major furniture and rooms have been completed, students can add decorations and objects related to the chosen department.
A hospital could have miniature medical charts, a medicine cabinet, a wheelchair, and a clock. A fire department could have helmets, hoses, lockers, and a miniature fire truck. A school could have books, pencils, posters, backpacks, and a classroom board.
A police department could include a small desk telephone, filing cabinets, a badge sign, and a police car. A science laboratory could include tiny test tubes made from straws, tables, scientific posters, and miniature instruments.
These details encourage students to think carefully about what happens inside the department.
Using Recycled Materials
This project is also a great lesson in recycling. Instead of buying new materials, students can reuse objects that would otherwise become waste.
A cereal box can provide cardboard for furniture. Bottle caps can become wheels or stools. Empty tissue boxes can become storage units. Paper tubes can become columns or containers. Old magazines can provide colorful pictures for posters.
Reusing materials teaches children that creativity does not depend on expensive supplies. A simple object can have a completely different purpose when viewed imaginatively.
Planning the Layout
Good organization is essential. Before attaching objects permanently, students should experiment with different layouts.
Large objects should usually be placed first. Smaller objects can then be positioned around them. There should be enough open space to make the different areas visible.
Students should also think about movement. If the model represents a workplace, where would people enter? Where would workers sit? Where would equipment be stored? Where would visitors wait?
Answering these questions helps students create a more logical and realistic model.
Making the Project Educational
The shoebox model can be more than an art project. It can also become a learning activity. Students can research the department they have chosen and explain its purpose to their classmates.
For example, a student creating a hospital emergency department can explain what happens when patients arrive, who works there, and what equipment may be used. A student creating a fire department can describe the responsibilities of firefighters and explain how the station is organized.
This combination of research and construction improves communication skills. Students learn to gather information, organize ideas, solve problems, and present their work.
Safety During the Project
Safety should always be considered when making crafts. Children should use scissors carefully and ask an adult for help when cutting thick cardboard. Strong adhesives, hot glue guns, and sharp tools should only be used with appropriate adult supervision.
The work area should be kept clean and organized. Small materials such as beads and buttons should be kept away from very young children because they can be choking hazards.
Using child-friendly glue and safe craft materials makes the activity enjoyable and suitable for classroom or home use.
Decorating the Outside
Although the inside is the main focus, the outside of the shoebox can also be decorated. The box can be covered with colored paper and labeled with the name of the department.
Students can draw a building entrance, windows, signs, trees, sidewalks, or other surroundings. A small cardboard path can lead toward the entrance.
The outside decoration can help transform an ordinary shoebox into a miniature building.
Presenting the Finished Model
When the model is finished, students can prepare a short presentation. They can explain what department they chose, why they chose it, what materials they used, and what each section represents.
A presentation can also describe the most difficult part of the project and how the student solved the problem. This encourages reflection and helps children become more confident when speaking in front of others.
Teachers can display completed models in the classroom, hallway, library, or school exhibition. Families can also use the models as decorations or educational displays at home.
Conclusion
Making a model of a department inside a shoebox is a simple project with many educational benefits. It combines creativity, construction, recycling, research, planning, and communication in one enjoyable activity. An ordinary shoebox can become a hospital, police station, fire department, school, laboratory, store, or another interesting workplace.
The project teaches children that large ideas can be represented through small models. By cutting cardboard, creating furniture, designing signs, arranging rooms, and adding miniature people, students learn how spaces are organized and how different departments serve different purposes.
Most importantly, the project encourages imagination. There is no single correct way to create a shoebox department. Every student can make different choices and add personal ideas. With simple materials and careful planning, an empty shoebox can become a detailed miniature world that tells a story.
Whether the project is completed at home, in the classroom, or as part of a school exhibition, the finished model can provide a sense of accomplishment. It demonstrates that creativity can turn everyday recycled materials into something useful, attractive, and educational. A department model inside a shoebox is therefore much more than a craft: it is a hands-on learning experience that helps children explore design, organization, teamwork, and the world around them.