Making a small cardboard school locker is a fun, creative, and educational craft project for children. Using a simple piece of cardboard or a small recycled box, children can create a miniature locker that looks like the ones found in schools. The locker can have a door, shelves, handles, labels, and even tiny school supplies inside. This project is perfect for classroom decorations, school-themed activities, miniature models, and creative projects at home.
A cardboard school locker is also a wonderful example of recycling. Instead of throwing away an old cereal box, packaging box, or piece of cardboard, children can transform it into something useful and attractive. The project combines creativity, construction, organization, and learning while helping children develop practical craft skills.
What Is a School Locker?
A school locker is a small storage compartment where students can keep books, notebooks, backpacks, jackets, sports equipment, and other personal belongings. Lockers are often arranged in rows along school hallways.
A miniature cardboard locker represents this familiar school object on a much smaller scale. It can be designed as a single locker or as a row of several lockers.
The model does not need to be exactly like a real locker. Children can create their own colors, decorations, labels, and interior features.
Why Make a Cardboard Locker?
There are many reasons to make a small cardboard school locker. First, it is inexpensive. Cardboard is easy to find and can often be collected from household packaging.
Second, the project is customizable. Children can choose the color of the locker and decorate it with names, numbers, stickers, drawings, and school symbols.
Third, the project can become part of a larger miniature school. A cardboard classroom, desks, chairs, school bus, paper students, and lockers can all be combined to create a complete school scene.
The activity also encourages children to practice measuring, cutting, folding, gluing, and problem-solving.
Materials Needed
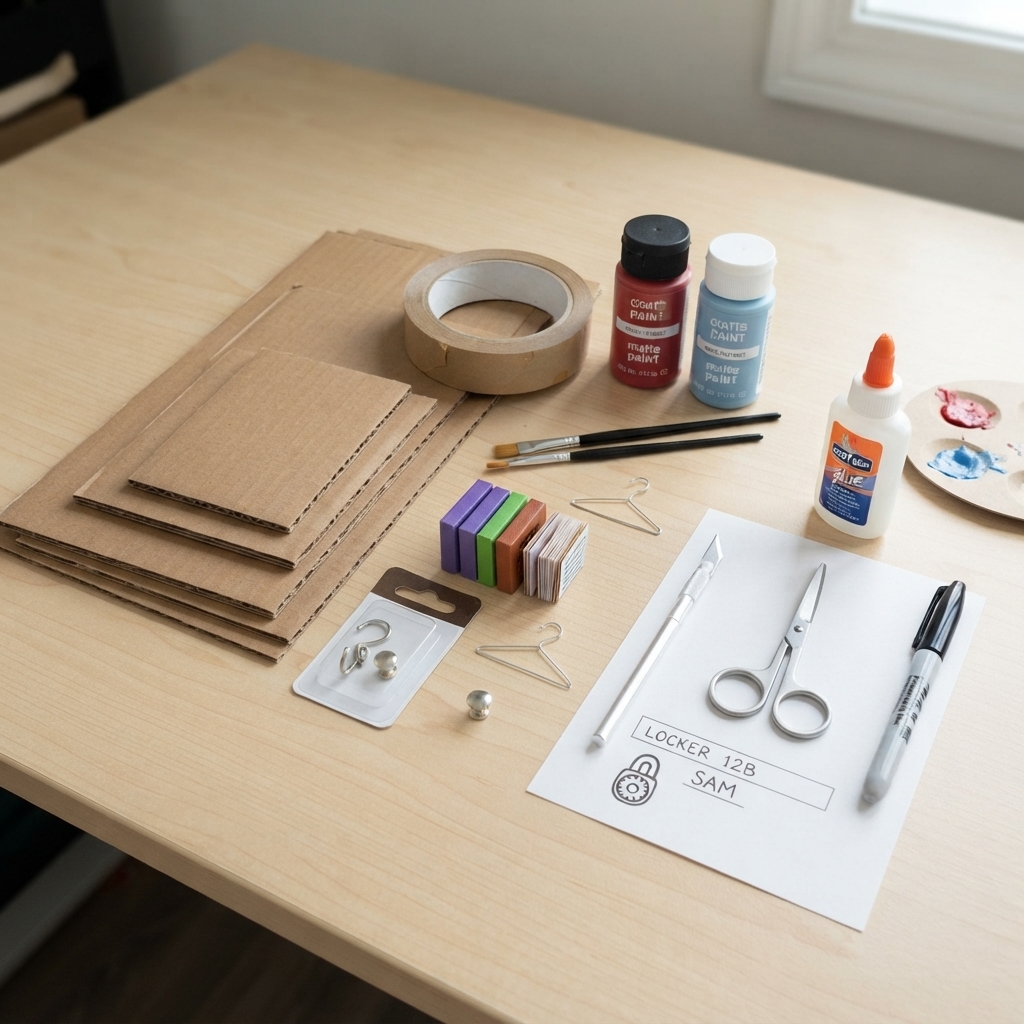
The materials for a cardboard locker are simple. The main material is a piece of cardboard or a small cardboard box.
Other materials include colored paper, white paper, glue, tape, scissors, a ruler, a pencil, and colored markers.
Optional materials include craft sticks, buttons, string, stickers, aluminum foil, small pieces of fabric, and recycled packaging.
A small piece of cardboard can be used to create shelves inside the locker.
Before starting, children should organize all materials on a clean table.
Choosing the Cardboard
The cardboard should be strong enough to stand upright. A cereal box can work well for a small locker, while thicker packaging cardboard can be used for a stronger model.
If using a box, the existing shape can sometimes become the main structure of the locker. If using flat cardboard, several pieces will need to be cut and assembled.
The size depends on the purpose of the project. A small locker can fit on a desk, while a larger model can be displayed on the floor or classroom shelf.
Planning the Locker
Before cutting the cardboard, children should sketch the locker.
The drawing can show the front, sides, top, bottom, and door. If the locker will have shelves, their positions should also be planned.
Children should decide whether they want one locker or several lockers side by side.
A row of lockers can be made by creating one long cardboard structure and dividing it into separate sections.
Planning helps avoid wasting materials.
Making the Main Structure
The main body of the locker can be made from a rectangular cardboard box.
If using flat cardboard, a large rectangular piece can form the back, while smaller pieces can form the sides and top.
The pieces can be joined with glue or strong tape.
The structure should be allowed to dry before the door and shelves are added.
A ruler can help make sure the sides are straight.
Creating the Locker Door
The door is one of the most important parts of the model.
A rectangular piece of cardboard can be cut slightly smaller than the front of the locker.
The door can be covered with gray, blue, green, red, or another color of paper.
It can be attached using tape along one side. The tape acts as a simple hinge and allows the door to open and close.
This makes the model more interactive.
Adding the Door Handle
A small handle can be created using a piece of cardboard, craft stick, button, or folded paper.
The handle should be attached near the edge of the door.
A small piece of string can also be used to create a handle.
For a more realistic appearance, children can draw a small lock or combination dial near the handle.
Making Shelves
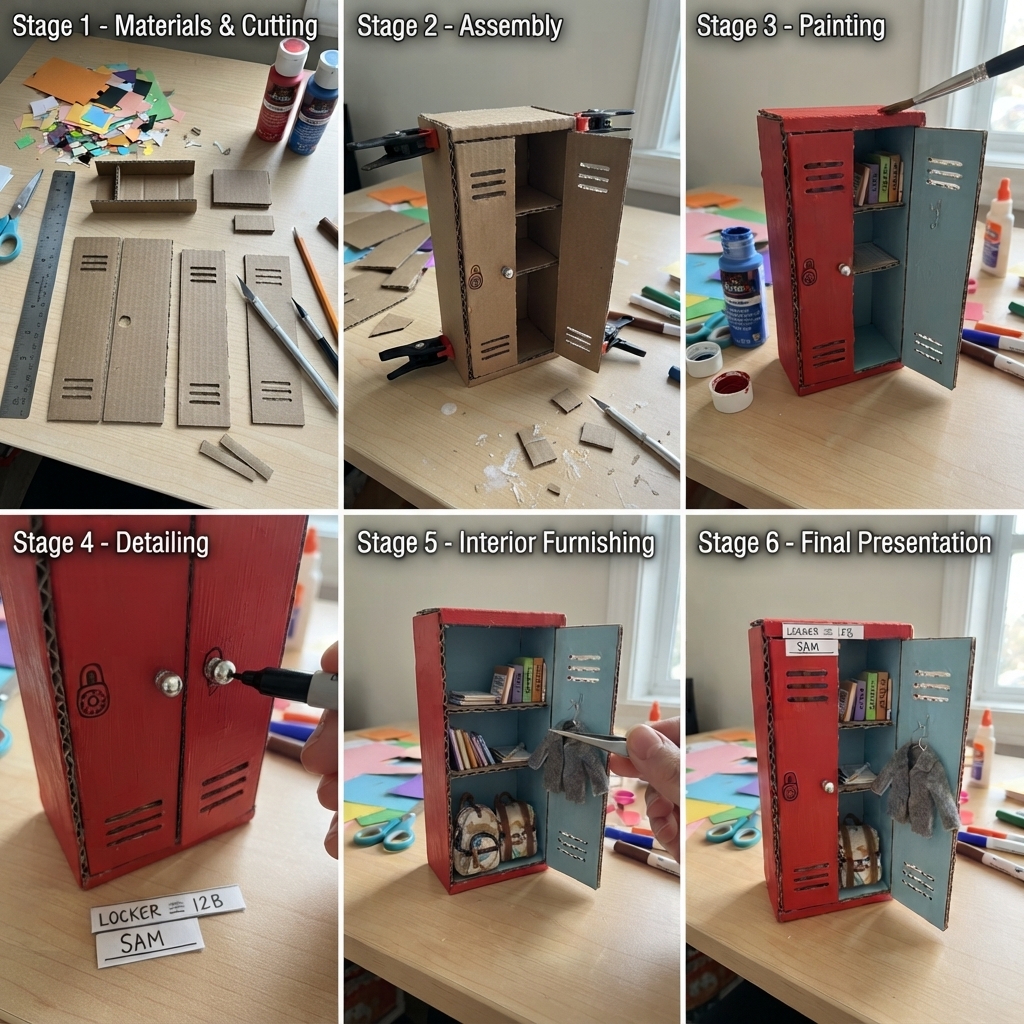
Shelves make the locker look more realistic and provide space for miniature school supplies.
Thin pieces of cardboard can be cut to fit inside the locker.
The shelves can be attached horizontally using glue.
One or two shelves may be enough for a small locker.
Children should make sure that the shelves are level and firmly attached.
Creating a Locker Interior
The inside of the locker can be decorated with colored paper.
A light gray or blue interior can create a realistic appearance.
Small hooks can be represented using tiny cardboard pieces or craft sticks.
Children can also add a miniature calendar, timetable, or motivational message to the inside of the door.
These details make the locker look like a real student’s personal storage space.
Making Tiny School Books
One of the most enjoyable parts of the project is creating miniature objects to put inside the locker.
Small books can be made by folding tiny pieces of paper in half. Colored paper can become the covers.
Children can write miniature titles such as “Math,” “Science,” “Reading,” or “Art.”
Several books can be stacked on a shelf.
This creates the appearance of a real student’s school materials.
Making a Miniature Backpack
A tiny backpack can also be placed inside the locker.
A small piece of cardboard can be covered with colored paper and decorated with a pocket.
Thin paper strips can become the backpack straps.
The backpack can be placed on the bottom of the locker or on one of the shelves.
Adding a Lunch Box
A small lunch box can be made from folded cardboard.
It can be decorated with colorful paper and a small handle.
A miniature lunch box adds another realistic detail to the school locker.
Children can also make tiny food shapes from paper, such as an apple, sandwich, or bottle.
Creating a Jacket
A small piece of fabric can represent a jacket or sweater hanging inside the locker.
A craft stick or thin cardboard strip can serve as the locker rod.
The fabric can be folded or attached to a tiny hanger made from wire or paper, with adult supervision when needed.
This gives the locker a more realistic appearance.
Adding a Name and Number
School lockers often have numbers or names.
Children can create a small label with a student’s name and attach it to the door.
A number can be written below it.
For a classroom project, each student could make a locker with their own name.
The lockers could then be arranged together to create a miniature school hallway.
Decorating the Locker
The locker can be decorated in many creative ways.
Students can add stickers, stars, hearts, flowers, sports symbols, or simple drawings.
They can also create a school mascot or favorite subject symbol.
A neat design can make the locker look attractive without covering too much of the main structure.
The inside of the door can contain a small motivational message such as “Believe in Yourself” or “Keep Learning.”
Making a Row of Lockers
One locker is fun, but a row of lockers can create an even more impressive school display.
Several cardboard compartments can be placed side by side.
Each locker can have its own door, number, and name.
Students can decorate their lockers differently while keeping the same basic structure.
This activity works particularly well as a classroom group project.
Creating a Miniature School Hallway
A row of cardboard lockers can become part of a miniature school hallway.
A large cardboard base can represent the floor. Paper walls can be decorated with posters, signs, and classroom doors.
The lockers can be placed against one wall.
Miniature students made from toilet paper rolls can stand nearby with tiny backpacks and books.
A cardboard school bus or school table and chair can also be included in the larger scene.
Educational Benefits
Building a cardboard school locker provides many educational benefits.
Children practice fine motor skills when cutting, folding, gluing, and decorating.
They also develop spatial awareness by thinking about how different pieces fit together.
Measuring the cardboard introduces basic mathematics. Children can compare lengths, count shelves, and calculate how much space is available inside the locker.
The activity also encourages planning and problem-solving.
Encouraging Organization
A locker is designed for organization, so the craft can provide an opportunity to talk about keeping school supplies organized.
Children can decide where books, bags, clothing, and lunch boxes should go.
They can learn that keeping belongings organized makes them easier to find.
This lesson can connect the craft activity to real-life school habits.
Recycling Benefits
The project is an excellent way to introduce children to recycling.
Old cardboard boxes can be reused instead of thrown away. Paper scraps can become decorations and miniature school supplies.
This demonstrates how ordinary waste can be transformed into useful objects.
Recycling also encourages children to think creatively before discarding materials.
Working Together
A cardboard locker project can be completed individually or as a group.
In a classroom, students can work together to create a hallway containing many lockers.
One group can build the locker structures, another can make miniature books and backpacks, and another can decorate the hallway.
Working together teaches cooperation, communication, and responsibility.
Safety Tips
Children should use scissors carefully and follow age-appropriate craft instructions.
Thick cardboard can be difficult to cut, so adults should help younger children.
If sharp tools or hot glue are needed, they should be handled by adults or used only under close supervision.
Small decorations such as buttons and beads should be kept away from very young children because they can be choking hazards.
The workspace should remain clean and organized throughout the project.
Displaying the Finished Locker
The completed locker can be displayed on a shelf, desk, or classroom table.
If several lockers are made, they can be arranged in a long row.
Children can place miniature school supplies inside and create a small school hallway around them.
A label explaining that the model was made from recycled cardboard can also be added.
Conclusion
Making a small cardboard school locker is a fun and educational craft project that allows children to transform simple recycled materials into a miniature version of a familiar school object. With cardboard, paper, glue, markers, and imagination, an ordinary box can become a realistic locker complete with a door, handle, shelves, labels, and tiny school supplies.
The project develops important skills such as measuring, cutting, folding, organizing, and problem-solving. It also encourages children to think creatively and understand the value of recycling.
The miniature locker can stand alone or become part of a larger school scene. Children can add desks, chairs, students, backpacks, books, a classroom, and a school hallway to create an entire miniature educational world.
Perhaps the most enjoyable feature is the opportunity to personalize the locker. Each child can choose a different color, name, number, pattern, and collection of school supplies. This makes every model unique.
Whether created as a school assignment, classroom decoration, recycling activity, or weekend craft, a small cardboard school locker is a wonderful project for young learners. It combines art, construction, organization, and imagination while showing that simple recycled materials can be transformed into something useful, attractive, and educational.